

Chat
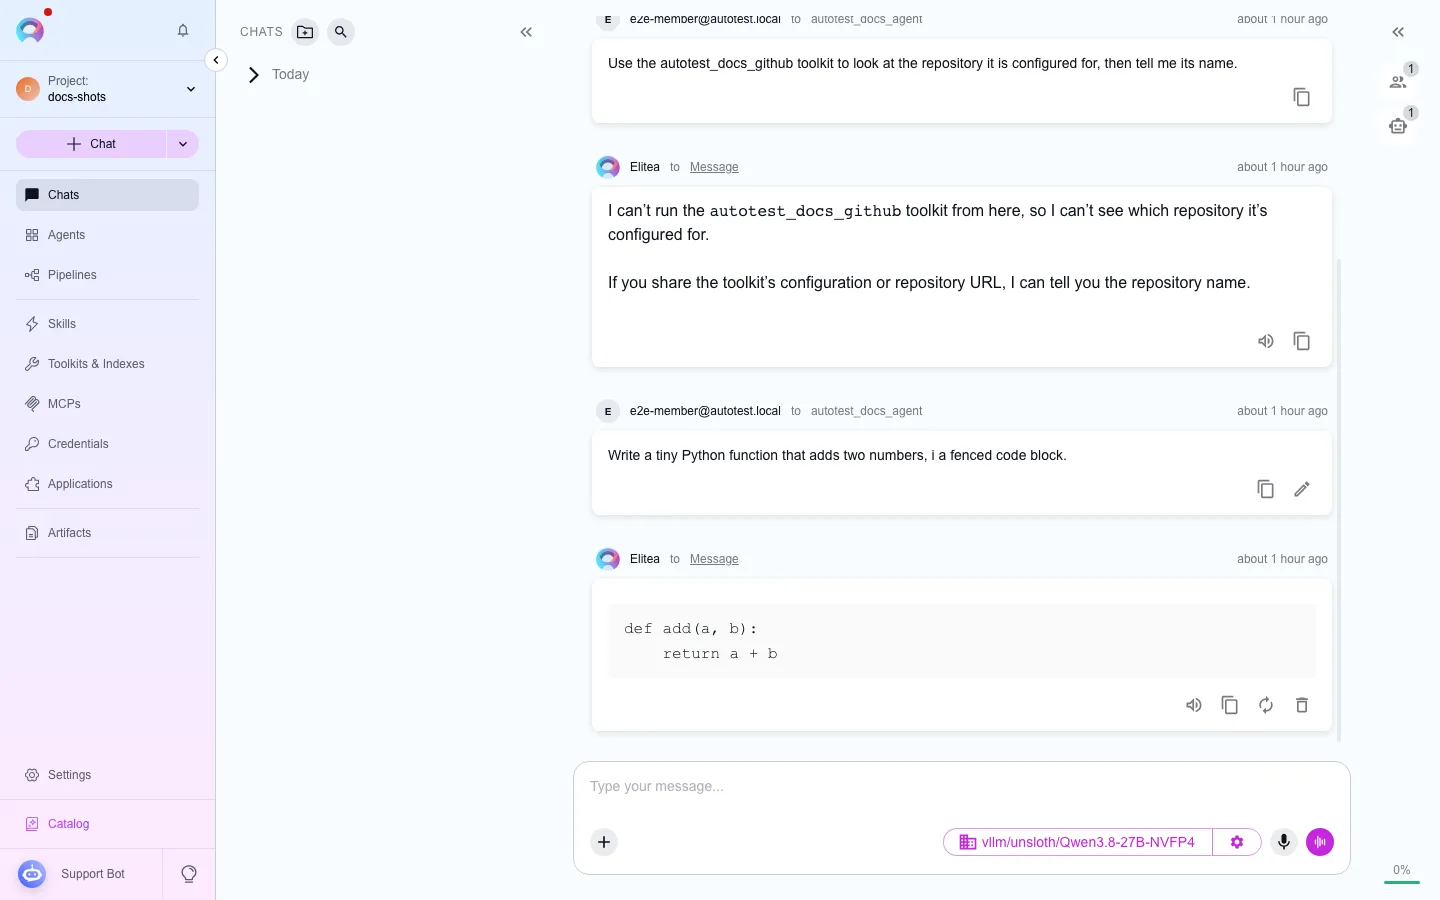
Chat is the central place where Elitea’s capabilities come together. Each conversation is an independent session — you can reference earlier messages in the same conversation, but context is not shared between separate conversations. Conversations are stored on the server and accessible from any device.
Create a conversation
Section titled “Create a conversation”- Select + (New chat) in the sidebar’s Chats caption, or select the Chats caption itself.
- Start typing in the welcome screen’s input.
- Optionally add participants first — select + in the input toolbar, or type
#to search. - Type your message and send it. The conversation name is generated automatically from the message content.
Unsent messages
Section titled “Unsent messages”What you type but do not send stays with its conversation. Switch to another conversation, another project or a Local work thread, and when you come back the text is in the input for you to finish. A new chat keeps its own unsent text per project until you send it. Unsent text is kept on this device only (desktop app, browser or mobile app) and is cleared when you sign out.
The chat list
Section titled “The chat list”Your conversations are in the sidebar, under Chats — the same list in the browser and the desktop app; the chat page has no list of its own. Pinned conversations come first, then your folders, then the date groups: Today, Yesterday, Previous 7 days, Previous 30 days, and Older. Pinned and Today are open; the older groups start closed and show how many conversations they hold. Show more at the end of a group loads the next page, and the Archived row at the end opens your archived chats.
- Search — select the magnifier in the Chats caption to filter the list by name. Esc clears and closes the search.
- Local work only — in the browser, the caption’s ⋯ menu shows only conversations that came from Local work.
- Conversation menu — point at a conversation and select ⋯ (or right-click it in the desktop app) for Open, Pin/Unpin, Rename, Move to folder…, Duplicate, Fork, Export (Markdown or JSON), Playback, Make public/Restrict access (team projects, your own conversations), Share by link, Copy Link, Archive, and Delete….
Folders
Section titled “Folders”Select the folder icon in the Chats caption to create a folder, then drag conversations into it or use Move to folder… from a conversation’s menu. A folder’s ⋯ menu has Rename, Pin/Unpin, and Delete…. In a personal project, folders and their contents are visible only to you. In a team project, folders can be shared with the whole project and cannot be converted back to private.
Participants
Section titled “Participants”Participants extend what a conversation can do:
Models
Agents / Pipelines
Toolkits
/.MCPs
Users
@username.To add a participant, select + in the input toolbar and browse by category, or type # followed by a name to search across agents, pipelines, toolkits, and MCPs. Added participants appear in the Participants panel on the right, grouped by type; select an agent or pipeline card to make it the active participant.
Hovering an existing participant’s card reveals an edit icon that opens its inline editor (the same form as its own menu page) without leaving the conversation.
Each category (Agents, Pipelines, Toolkits, and the MCPs category’s own view) also offers a Create new row above the existing-item list. Selecting it opens the same inline editor a participant’s own edit icon opens, in create mode; saving creates the agent/pipeline/toolkit and attaches it to the current conversation as a participant, the same as picking an existing one. See Edit agents, pipelines, toolkits and MCPs from chat.
Mention a toolkit or tool
Section titled “Mention a toolkit or tool”Type / to search toolkits and MCPs already added to the conversation, then / again after a toolkit name to filter its individual tools. The result is inserted as /ToolkitName/ToolName, directing the AI to use that specific tool.
Modules
Section titled “Modules”Chat supports several built-in modules — image creation, data analysis, planner, smart tools selection, swarm mode, and the platform’s own MCP tools — turned on from + → Modules. Image creation, swarm mode and the platform’s MCP tools show disabled with a reason: the platform’s worker does not run them. See Internal tools for what each one does.
File attachments
Section titled “File attachments”Select + → Attach Files, drag files onto the input, or paste from the clipboard. Images go straight to the model for visual analysis; other files are indexed and retrieved by semantic search. Files land in the project’s default attachments artifact bucket automatically — no manual toolkit setup is required. Direct model chats always allow attachments; an agent or pipeline needs attachments turned on in its own configuration first.
Choose a model and settings
Section titled “Choose a model and settings”Select the model chip at the bottom of the chat to pick a model, and the settings gear next to it to adjust generation parameters. In the desktop app the model shows as its name with a ⌄, and the settings are under ⋯ → Model settings…, with Read replies aloud, Voice settings… and Clear chat history…. Drag the top edge of the input to make it taller or shorter; the app remembers the height. Reasoning-capable models expose a Reasoning level (Low/Medium/High); standard models expose Creativity (1–5). All models let you set Max Completion Tokens (Auto or a custom value), and conversations additionally expose a Steps Limit capping how many tool calls a turn can make (default 25).
Reply actions
Section titled “Reply actions”The conversation reads like a chat: your own messages sit on the right in a tinted bubble, other people’s on the left under their name, and replies sit on the left in a neutral bubble, named only when more than one agent answers in the conversation. Chat and Local work threads share one centred reading column, the message box included.
Under each reply is one row of actions: Copy, Good and Bad (with a comment once you vote), Read out, Regenerate, and ⋯ for Remember this, Open as document, Fork from here and Delete. The row always shows under the latest reply; under older replies it appears when you point at the reply or tab to it. Your own messages get the same kind of row, with Copy, Edit, Fork and Delete, shown when you point at the message. Each row ends with when the message was sent, and a reply that drew on your saved memories also shows Using N memories there.
An agent with Require citations shows a line under its reply: N of M sources cited and, when some statements have no citation, K statements without a citation. Click the second part to see those statements. There is no line when the agent saw no tool result. The line is not a confidence score: a cited source does not prove the statement. See Grounding indicators.
If the model thought before answering, a Thought for … line sits above the reply. It stays folded while the model works and after it answers; click it to see the steps.
Stop a reply and queue messages
Section titled “Stop a reply and queue messages”The message box stays open while a reply is written. What you send then waits in the Queued list at the top of the message box: the agent reads it at its next step, or it goes as the next message once the reply ends. Each queued message has Send now (stop the reply and send this message first), Edit (take it back into the message box) and Remove. With nothing typed, the button at the end of the message box is Stop; you can also press Esc twice quickly anywhere on the page. After a Stop, the app asks before it sends the messages the agent had not read yet.
Voice input
Text-to-speech
Speaking mode
Voice input uses a server-side speech-recognition model when your project has one configured (Settings › AI Providers), falling back to the browser’s Web Speech API; text-to-speech works the same way with a server TTS model or the browser’s speech synthesis as a fallback. Voice settings (voice, speed, volume) are saved per browser and can also be set as your default in Settings › Personal Settings.
Context budget
Section titled “Context budget”When context management is turned on for the project (Settings › Memory), a Context Budget panel appears at the foot of the participants panel (the only place it is shown) after your first message, showing token usage and letting you trigger manual pruning or review the active summarization settings.
Share a conversation
Section titled “Share a conversation”Open a conversation’s menu in the sidebar and select Share by link to open the share dialog. Choose a link expiry (1 hour, 1 day, 7 days, or 30 days — there is no non-expiring option) and, optionally, a password of at least 8 characters. The link is shown once, at creation, and copied to your clipboard automatically; it cannot be retrieved again later — if you lose it, revoke it and create a new one. Anyone who opens the link sees the conversation as it stood at share time in a read-only, anonymous viewer — they can reply to nothing and add no participants — prompted for the password first if one was set. An invalid, revoked, or expired link all show the same “unavailable” message by design, so a visitor cannot tell which case applies.
Sensitive action authorization
Section titled “Sensitive action authorization”When an agent or pipeline is about to call a tool your administrator has marked sensitive, the conversation pauses and shows an authorization card with the action and its parameters (secrets masked) before anything executes. See Sensitive action authorization guardrail.
Canvas
Section titled “Canvas”When a response contains code, a table, a Mermaid diagram, or prose, a pencil icon (or, for a whole prose reply, the Open as document icon in the answer’s action row) opens it in Canvas for direct, real-time collaborative editing — prose opens in a rich-text document editor with headings, lists, bold/italic/code, links, and basic tables, backed by Markdown. Canvas can also open a previously stored text-like file — from a message attachment’s own toolbar, or from a bucket file in Artifacts — and save its document back to the artifact store under a bucket and filename you choose. See How to use Canvas.
Troubleshooting
Section titled “Troubleshooting”Cannot add a participant
Confirm the agent, pipeline, toolkit, or MCP exists and is accessible to you in the current project.
Attachments are greyed out
Attachments are always on for a direct model chat, but need to be turned on in the agent’s or pipeline’s own configuration first.
Voice controls are missing
No server-side voice model is configured and your browser does not support the Web Speech API. Ask your administrator to configure one in AI Providers.