

Authentication
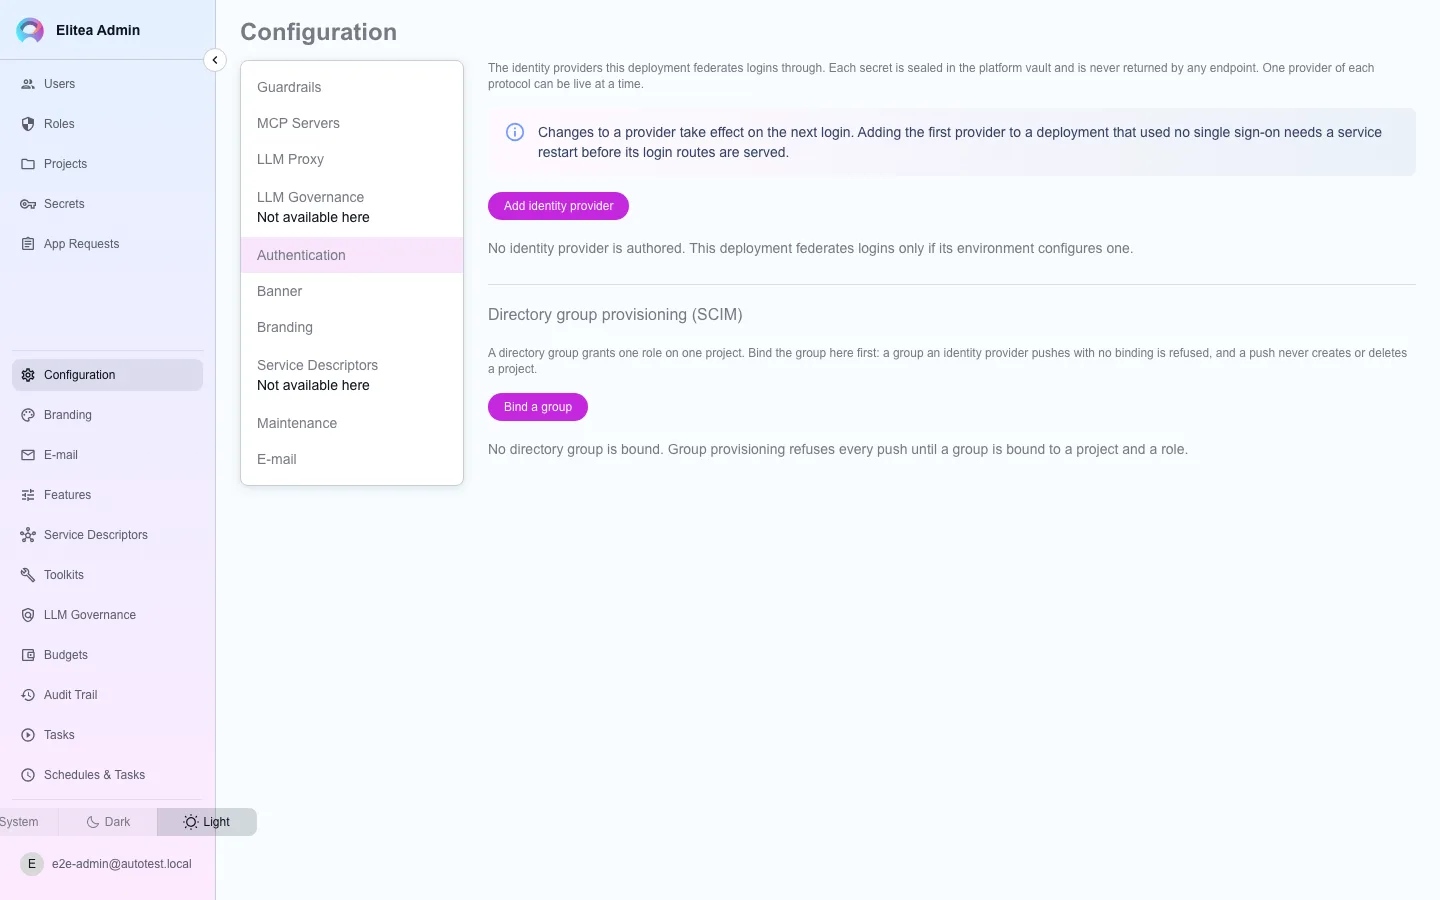
Authentication lives under Configuration › Authentication in the admin console. It covers how people sign in (OIDC or SAML) and how an identity provider’s groups map onto project membership (SCIM).
Configure an identity provider
Section titled “Configure an identity provider”Open Configuration › Authentication
The list shows any providers already configured, one live per protocol.
Add a provider
Choose OpenID Connect or SAML 2.0.
Issuer URL (a
.well-known/openid-configurationURL is accepted and reduced to its issuer), Client ID, client secret, redirect URI, scopes, and whether e-mail verification is required.Identity-provider entity ID, SSO URL, single-logout URL, and certificate(s); this service’s own entity ID and ACS URL; name-ID format; the e-mail and name attribute mappings; whether to sign AuthnRequests; the service provider certificate; and clock-skew tolerance.
NameID format is a select. The values are Not requested (the default), Unspecified, Email address, Persistent and Transient. With Not requested, the identity provider sends its own default format. With Transient, the NameID changes at each sign-in, so also set the e-mail attribute.
The service provider metadata is at
https://<host>/auth/saml/metadata. Import it at the identity provider after you enable the provider. It is available with or without Sign authentication requests. It always contains the entity ID, the ACS URL (HTTP-POST) and the selected NameID format, and it asks for signed assertions. It contains the service provider certificate only when requests are signed.Decide whether it may sign in SCIM-provisioned users
Users provisioned by SCIM may sign in through this provider is off by default. Turn it on only for the provider paired with your SCIM client (for example, Entra ID’s sign-in app when Entra also provisions users). While it is off, a first sign-in through this provider cannot take over an account that SCIM created; the sign-in is refused as a conflict. A provider configured through environment variables instead of this screen uses
OIDC_ADOPT_SCIM_USERS=truefor the same setting.Enable it for logins
Turning a provider on retires any other provider of the same protocol — only one live OIDC and one live SAML definition can exist at a time, because each protocol is served on one route.
OIDC sign-in rules
Section titled “OIDC sign-in rules”The platform links an account to the OIDC subject (the id_token sub claim), stored as oidc:<sub>. The email claim only selects the account on the first login of a subject. These rules apply to every OIDC sign-in:
| id_token | Result |
|---|---|
No email claim | Refused: 400 email claim required. |
"email_verified": false | Refused on every login: 403 email claim is not verified. This is always so. Neither OIDC_REQUIRE_EMAIL_VERIFIED nor the provider’s e-mail verification setting changes it. |
No email_verified claim, subject already linked | Accepted. |
No email_verified claim, first login of the subject | Accepted when e-mail verification is not required. Refused with 403 email claim is not verified when it is required. |
"email_verified": true | Accepted. |
“E-mail verification is required” is the whether e-mail verification is required setting of a provider on this screen. For a provider configured through environment variables, it is OIDC_REQUIRE_EMAIL_VERIFIED=true. The default is off, because many identity providers omit the claim.
The platform requests the scopes openid, profile and email (a provider on this screen can set its own list). Keep the email scope:
- In Keycloak, keep the
emailclient scope assigned to the client. If you remove it, Keycloak refuses the authorization request withinvalid_scope. Without the scope, the id_token also has noemailclaim, and the login is refused. - In Keycloak, a user whose Email verified flag is off gets
"email_verified": false, so the login is always refused. Turn the flag on for the user, or let the user verify the address in Keycloak.
When an OIDC login answers 409
Section titled “When an OIDC login answers 409”A 409 means that the login cannot use the account that the email claim names. Only an operator can resolve it. The body names the cause, and the elitea-main log has the warning OIDC: refused a login that names two accounts with the sub and the cause:
| Body starts with | cause in the log | Meaning and remedy |
|---|---|---|
this identity is already linked to another account. If your identity provider re-created your user | oidc_subject_holds_account | Another OIDC subject holds the account. Usually the identity provider re-created the user. Relink the account. |
this identity is already linked to another account: the account with this email address signs in through SAML | saml_subject_holds_account | A SAML identity holds the account. An OIDC login never takes over an account of the other protocol. The user signs in through SAML. oidc-relink does not apply. |
the account with this email address is provisioned by the directory (SCIM) | scim_adoption_refused | The account was created by SCIM, and this provider may not sign in SCIM-provisioned users. If this provider is the one paired with your SCIM client, turn on Users provisioned by SCIM may sign in through this provider (OIDC_ADOPT_SCIM_USERS=true for a provider configured through environment variables). oidc-relink does not apply. |
the email address your identity provider now sends belongs to another account | email_held_by_another_account | The subject is linked, and its new address is the address of a different account. Change the address of one of the two accounts. |
your account changed while you signed in | concurrent_change | The account or the link changed during the login, for example a concurrent delete. Sign in again. |
Relink an account after the identity provider re-created a user
Section titled “Relink an account after the identity provider re-created a user”When an identity provider deletes a user and creates it again, the user gets a new sub. The account still holds the old subject, so the login of the new subject is refused with 409:
this identity is already linked to another account. If your identity provider re-created your user, ask an administrator to relink your account (elitea-main oidc-relink).This refusal is intentional: only an operator can confirm that the two subjects are the same person. Do not edit auth_core__user_provider by hand. Use the oidc-relink command of the elitea-main image. It reads DATABASE_URL, so run it in an elitea-main pod:
Find the new subject
Read the new user’s ID in the identity provider (in Keycloak, the user’s ID field). Or read the
subvalue in theOIDC: refused a login that names two accountswarning in the elitea-main log.Print the plan
Terminal window kubectl -n <ns> exec deploy/elitea-main -- \/elitea-main oidc-relink --user alice@example.com --sub NEW_SUB--usertakes the numeric user id or the email address. The command prints the account, its current OIDC links and the change. It writes nothing.Apply the change
Terminal window kubectl -n <ns> exec deploy/elitea-main -- \/elitea-main oidc-relink --user alice@example.com --sub NEW_SUB \--apply --operator YOUR_USER_ID--operatoris your own numeric user id. It is recorded in the audit event. The user can then sign in.
Instead of --sub, you can use --clear. It removes the old link, and the next login of the user joins the account by email again. That login must pass the sign-in rules for a first login, and a SCIM-provisioned account is joined only by a provider that may sign in SCIM-provisioned users.
For a SCIM-provisioned account, use --clear: the command refuses --sub. A login links such an account only through a provider that may sign in SCIM-provisioned users. An oidc:<sub> link does not name its provider, so the command cannot check that setting, and a link that it wrote would bypass it. After --clear, the next login applies the provider’s own setting.
The command refuses, with exit code 2, and changes nothing when:
- the email matches more than one account (the addresses are compared without case). Give the numeric user id.
- the account has more than one OIDC link. Name the one to change with
--old-sub. - another account already holds the new subject. The command names that account’s user id. Resolve that account first.
--subnames a SCIM-provisioned account. Use--clear.
The command takes the same per-subject lock as a login, so a first login of the new subject and a relink to it do not both link it.
Each applied change writes the security audit event ai.elitea.security.v1.identity.link.changed in the same transaction. The action is identity.oidc_link.replaced, identity.oidc_link.cleared or identity.oidc_link.added (a new subject on an account with no OIDC link). The resource is the user, the principal is user:<operator id>, and the reasons are provider_namespace:oidc and via:oidc-relink. The event holds no subject and no hash of a subject: a subject is often guessable (a numeric id or an email address), so its hash would disclose it. The plan that the command prints shows the subjects to the operator. See Audit trail.
The command changes OIDC links only. A SAML login with a changed NameID gets the 409 this identity is already linked to another account, and has no command yet.
Session policy
Section titled “Session policy”The risk
Section titled “The risk”A browser session that never expires, or that stays valid while nobody uses it, extends the time an attacker can use a stolen session or an unattended computer. Your identity provider decides how often people sign in, but the platform’s own session decides how long a signed-in browser keeps working.
What is enforced
Section titled “What is enforced”Every browser session has an absolute expiry and an idle timeout. Under Configuration › Session Policy, a platform administrator (permission runtime.plugins) sets two maximums:
| Setting | Effect | Range |
|---|---|---|
| Maximum Idle Timeout (seconds) | A session with no request for this long is ended. A session that had no idle limit gets this limit. | 0 (no maximum), or 60 to 2592000 (30 days) |
| Maximum Session Lifetime (seconds) | A session is ended this long after sign-in, whatever its activity. | 0 (no maximum), or 60 to 31536000 (365 days) |
Both are 0 by default, so an upgrade keeps the session lifetimes of earlier releases.
A maximum applies to new sessions when they are created, and the cookie lifetime follows it. It also applies to existing sessions: each request checks the session against the earlier of its own deadline and the deadline the maximum gives. When you lower a maximum, sessions that are already past it end at their next request. Raising a maximum never makes an existing session last longer.
Each replica of the main service reads the policy again after at most 15 seconds, and at once on the replica that saved it. If the policy cannot be read, sign-in fails with 500 and requests with a session fail with 503. The platform does not let a session through without its bound.
Evidence
Section titled “Evidence”Each session has a reference number that is not secret (browser_sessions.ref). The platform writes one audit event for each step of a session’s life:
| Action | When |
|---|---|
session.start | A browser signed in. |
session.expire | The session passed its idle timeout or its absolute lifetime. entity_name gives the reason, idle or absolute. |
session.logout | The user signed out. |
session.revoke | The server ended the session: for example, an administrator deactivated the user, or SCIM deprovisioned them. |
{ "event_type": "session", "action": "session.expire", "user_id": 4, "entity_type": "browser_session", "entity_id": 42, "entity_name": "provider=oidc reason=idle", "duration_ms": 3600000}duration_ms is the age of the session when it ended. A background job writes these events within about a minute, exactly once each, and an expiry carries the time the session actually ended. The events go to your SIEM with the other audit events (see Audit evidence and retention). No cookie or token value is ever written.
Every run that a browser session started records the session’s reference (execution_jobs.browser_session_ref), so you can join a run to the session that started it. Runs started with an API token have no session reference.
Customer responsibility
Section titled “Customer responsibility”- Set the sign-in frequency and multi-factor policy in your identity provider. The session policy limits how long a browser stays signed in after that.
- Choose maximums that match your organisation’s policy for unattended devices.
Connect an identity provider with SCIM
Section titled “Connect an identity provider with SCIM”SCIM lets an identity provider push its directory. It creates accounts when people join and deactivates them when they leave. The SCIM endpoint is /api/v2/scim/v2.
An identity provider authenticates to SCIM with a SCIM client. A SCIM client is a credential that belongs to the integration, not to a person. The audit trail records its changes as scim:<client name>.
Open Configuration › Authentication › SCIM provisioning
The panel shows the Tenant URL and the Token endpoint of this deployment, each with a copy button. You need the
admin.auth.userspermission to manage SCIM clients.Create a SCIM client
Select New SCIM client. Type a name for the identity provider, and select a method:
- Secret token (Bearer) — one secret. The identity provider sends it as the bearer token on each request.
- OAuth2 client credentials — a client identifier and a client secret. The identity provider gets a short-lived access token from the token endpoint (1 hour by default), and sends that access token.
Optionally, set Expires on. The date must be from tomorrow to two years ahead. After that day the client stops working. The list shows the days left, and it shows a warning in the last 30 days.
Copy the secret
The secret shows one time only. Copy it into the identity provider before you close the dialog. Elitea keeps only a hash of the secret, so nobody can show it again.
Microsoft Entra ID settings
Section titled “Microsoft Entra ID settings”In the Entra ID enterprise application, open Provisioning, set the mode to Automatic, and use these values:
| Entra ID field | Bearer authentication | OAuth2 client credentials grant |
|---|---|---|
| Authentication method | Bearer authentication | OAuth2 client credentials grant |
| Tenant URL | https://<host>/api/v2/scim/v2 | https://<host>/api/v2/scim/v2 |
| Secret token | the scim_… secret | — |
| Token endpoint | — | https://<host>/api/v2/scim/oauth/token |
| Client identifier | — | the scimc_… client identifier |
| Client secret | — | the scimcs_… client secret |
Select Test connection. Entra ID calls /Users with the credential, and a correct credential answers 200.
The token endpoint accepts grant_type=client_credentials with the client identifier and secret in the form body (client_secret_post) or in an HTTP Basic header (client_secret_basic). The operator sets the access token lifetime with ELITEA_SCIM_ACCESS_TOKEN_TTL (between 5m and 24h).
Each OAuth2 client can hold at most 20 live access tokens. A new token removes the oldest one. Failed token requests are limited per client identifier and caller address. After 20 failures in one minute, that address gets 429 until the minute ends, also with the correct secret. Failures from one address never block another address, so an attacker cannot lock out your identity provider. To know the real caller address behind an ingress, set the proxy networks in ELITEA_TRUSTED_PROXY_CIDRS (or trusted_proxy_cidrs in the Form authentication document). Without them the caller address is unknown. The endpoint then checks every secret first, so a correct secret is never refused, and it limits only failures.
Rotate or revoke a SCIM client
Section titled “Rotate or revoke a SCIM client”- Rotate makes a new secret. The old secret stops working immediately, and every access token issued with it stops working too. Put the new secret in the identity provider at once.
- Revoke stops the client from authenticating. The row stays in the list, so the audit trail can still name it.
- Delete removes the client.
Bind SCIM groups to a project role
Section titled “Bind SCIM groups to a project role”What the admin console does provide is the group-to-role mapping, beneath the identity provider list:
Create a binding
Name the SCIM group exactly as your identity provider sends it, and choose the project and role it grants.
Understand membership
A member the group granted the role to loses it when they leave the group. A member who already held that role independently keeps it — the identity provider is authoritative only over what it granted, not over everything it happens to find.
What SCIM may and may not change
Section titled “What SCIM may and may not change”SCIM manages ordinary accounts: it creates them, renames them, changes their display name and name parts, and deactivates them. A SCIM DELETE deactivates (suspends) the account instead of deleting it, so the person’s work stays attached if they return.
Some accounts are off limits to SCIM. Any write to them is refused with 403 (scimType: mutability), the reason is included in the response, and the refused attempt is recorded in the Audit Trail:
- Accounts with an administration role (any role on the admin console’s Users page). SCIM cannot rename, suspend or deprovision them, including people who became administrators after SCIM created their account. This stops a SCIM credential from taking over or locking out the people who administer the platform.
- Platform accounts — addresses in the
@centry.userdomain, such assystem@centry.userand the per-projectsystem_user_<n>@centry.user. SCIM also cannot give any account an address in that domain, and a SCIM group cannot grant a project role to a platform account.
Deprovision an administrator
When your identity provider tries to deprovision someone who holds an administration role, the request is refused with “SCIM deprovisioning refused: account holds an administration role — remove the role, then let the IdP retry”. Until then, the person’s sessions and access tokens keep working.
Remove the role
On the admin console’s Users page, remove the person’s administration role. You can also suspend them from that page right away.
Let the identity provider retry
The next provisioning cycle repeats the request, and this time it succeeds.